
My mom is planning my baby shower for late August, but she procrastinates and I love doing things myself (obviously). So, I started by making my invitations. I wanted to have a natural feel to the event and invites, below you'll see my inspiration invitations and my actual invitations.
Invitation Inspiration:
Yes, they're wedding invitations but my wedding invitations were not very fancy. So, I'm making up for it with these.

Invitation Materials:
Most materials were purchased from Paper-Source.com and from Paper Crazy, a small local business here in Phoenix.

Materials include:
Envelopes from paper-source
Metallic Purple Backing, Recycled Card Stock and Purple Ribbon from Paper Crazy
Peacock Feathers
Hot Glue Gun and Monogram Seal from Michaels
Bright Orange "Wax" seal from Etsy
Luckily I had a paper cutter already, and the translucent labels too. Total cost for all these items was somewhere around $100 for 33 invitations. It breaks down to a little under $3 an invite and I have a bunch of peacock feathers and a little wax left over. Plus, now I own a real hot glue gun as opposed to a mini gun.
The envelopes are #10 size. The purple backing was cut to 9.25in x 3.75in. I designed the invitations in Adobe Illustrator and then printed them 3 to a page. The Natural Recycled Paper was cut to 8.5in x 3.25in after printing. The Ribbons were cut to 4.5inches and then hot glued on the back of the Natural Paper. Make sure to have a popsicle stick (or, I used the "wrong" end of a paint brush) to press down the ribbon onto the hot glue, it saved a lot of time and I only got burnt once. Then, we put a dab of hot glue in each corner on the back and centered the Natural onto the Purple paper. Brittany added the peacock feather after this step (but she had already preped them buy cutting them down to about 3-4inches). Below is the result of our hard work.
Finished Product:
Brittany helped with the assembly and prep. work so I owe her a big THANKS!

With the Envelope:

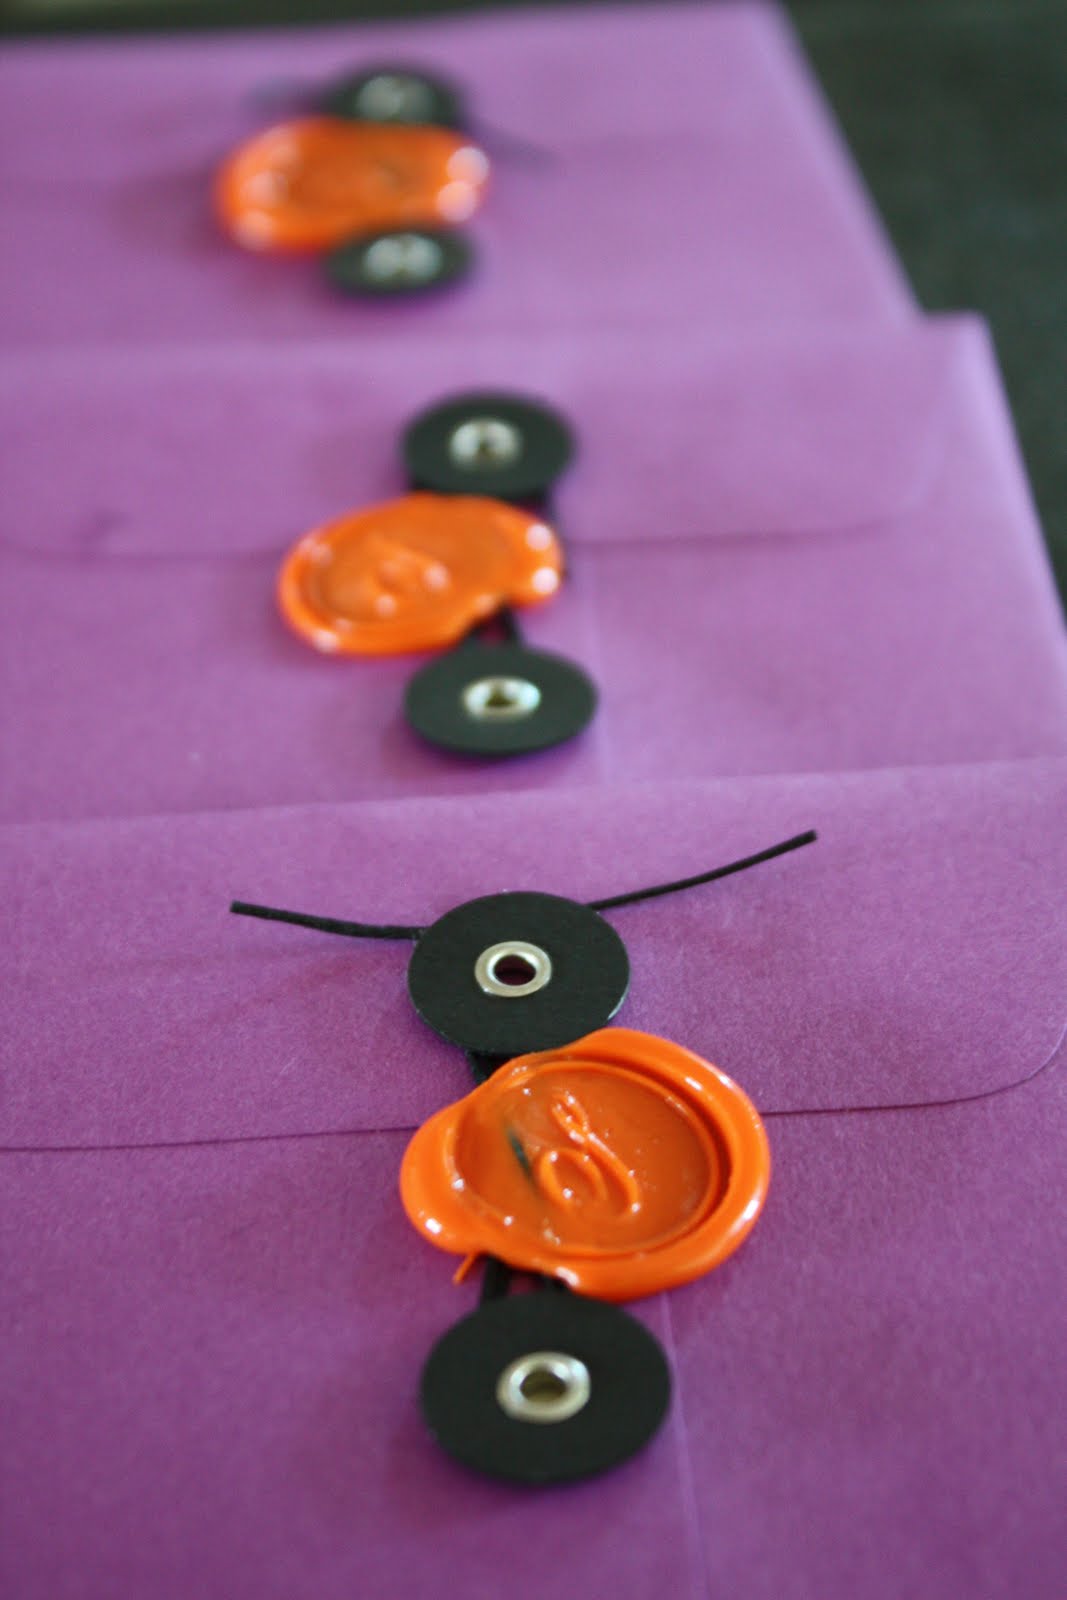
Once we got them into the envelope, we added the seal. I heated up the glue gun and swaped out the regular glue for my bright orange "wax" sticks. I sprayed my seal with pam (which p.s. I would NEVER cook with- we use coconut oil spray instead. But, I had some at the house already because it comes in really handy for projects like this). After I added two pumps of orange "wax" to the envelope, I let it set up for a few seconds. Then I gently pressed the seal into the "wax." If you push too hard it will smoosh all the wax out and you'll end up with a translucent seal and hardly be able to see it. I then gently twist/jiggle/pull the seal off, you have to wait until it's really cooled or you'll smudge the seal, but if you have enough pam on the seal it should come up easy. I re-pam every two seals. If you've NEVER used a seal before with this wax you'll want to practice on scrap paper, it's not worth ruining your invitations over. Happy Sealing!
Sealing and Stamping:

Ready for the Mailbox:

Fiends and Family: if you got me your address as requested, you should get these in the mail by August 13th at the latest!
Happy Crafting!
-Jenn
Invitation Inspiration:
Yes, they're wedding invitations but my wedding invitations were not very fancy. So, I'm making up for it with these.
Invitation Materials:
Most materials were purchased from Paper-Source.com and from Paper Crazy, a small local business here in Phoenix.

Materials include:
Envelopes from paper-source
Metallic Purple Backing, Recycled Card Stock and Purple Ribbon from Paper Crazy
Peacock Feathers
Hot Glue Gun and Monogram Seal from Michaels
Bright Orange "Wax" seal from Etsy
Luckily I had a paper cutter already, and the translucent labels too. Total cost for all these items was somewhere around $100 for 33 invitations. It breaks down to a little under $3 an invite and I have a bunch of peacock feathers and a little wax left over. Plus, now I own a real hot glue gun as opposed to a mini gun.
The envelopes are #10 size. The purple backing was cut to 9.25in x 3.75in. I designed the invitations in Adobe Illustrator and then printed them 3 to a page. The Natural Recycled Paper was cut to 8.5in x 3.25in after printing. The Ribbons were cut to 4.5inches and then hot glued on the back of the Natural Paper. Make sure to have a popsicle stick (or, I used the "wrong" end of a paint brush) to press down the ribbon onto the hot glue, it saved a lot of time and I only got burnt once. Then, we put a dab of hot glue in each corner on the back and centered the Natural onto the Purple paper. Brittany added the peacock feather after this step (but she had already preped them buy cutting them down to about 3-4inches). Below is the result of our hard work.
Finished Product:
Brittany helped with the assembly and prep. work so I owe her a big THANKS!

With the Envelope:

Once we got them into the envelope, we added the seal. I heated up the glue gun and swaped out the regular glue for my bright orange "wax" sticks. I sprayed my seal with pam (which p.s. I would NEVER cook with- we use coconut oil spray instead. But, I had some at the house already because it comes in really handy for projects like this). After I added two pumps of orange "wax" to the envelope, I let it set up for a few seconds. Then I gently pressed the seal into the "wax." If you push too hard it will smoosh all the wax out and you'll end up with a translucent seal and hardly be able to see it. I then gently twist/jiggle/pull the seal off, you have to wait until it's really cooled or you'll smudge the seal, but if you have enough pam on the seal it should come up easy. I re-pam every two seals. If you've NEVER used a seal before with this wax you'll want to practice on scrap paper, it's not worth ruining your invitations over. Happy Sealing!
Sealing and Stamping:

Ready for the Mailbox:
Fiends and Family: if you got me your address as requested, you should get these in the mail by August 13th at the latest!
Happy Crafting!
-Jenn
No comments:
Post a Comment