As some of you might know I've taken up a new hobby slash business endevor. I'm constantly learning new artistic skills and crafts. I love more ways to add beauty to this world so if there is a technique or skill I haven't mastered yet, I will find it and learn as much as I can about it. My most recent interest has been in henna. I'm still very new to this whole world of stains and pastes. I don't know all the pigments and recipes, to start practicing I ordered all my cones premade from mehndika joey henna and she's based out of Las Vegas although frequently travels to the UK. I love her cones, and no point in fixing something that's not broken! However, this summer we're going to visit my sister in Switzerland and she asked that I do henna on her while I'm there, the only problem is that the paste is perishable once mixed. I have to keep cones in my freezer and thaw minutes before use. I knew that the stain would be weak by the time we got to see her {because we're stopping in Spain first} So! it forced me to try something new! I ordered a mix kit form Henna Caravan and it had 5 different 20 grams packages of henna, simple instructions and everything else you could need for henna on their site. I asked my friend Diane, who's the one who handed me my first cone, to come over and supervise while I try out this whole henna paste thing. And, I'm so grateful, she did.
The mix came with 3 different years of henna crops from Jamila powder. I decided to try the 2013 one as practice because Diane mentioned everyone loved the 2015 crop so I wanted to save that for our travels. Because these little baggies came pre-measured, I didn't need a scale (but it's definitely something I will be getting in the future as I really enjoyed this process)
Mix together in a glass or ceramic bowl, henna does stain plastics and silicone. I mixed the powder with about half the suggested water to start, always safer to add more water than too much. I added about a teaspoon and a half of sugar total, and for the future I'll probably need to remember that in the dry desert 2 teaspoons is better. I also used my own blend of essential oils, lavender to help with the henna release and 15 drops of frankincense because it's my favorite for a total of about a teaspoon and a half.
Diane checked the consistency of my paste and suggested we let it sit 4-6 hours to make sure it's released the dye and that it will stain best. She even gave me the plastic cover to keep it air tight as I don't own any plastic wrap (because of my war on plastic! I guess it does have it's purpose - sometimes)
After the paste was mixed and sitting, she showed me how to roll my own cones. Something I was super nervous about and actually also ordered a few (larger) ones form henna caravan.
Turns out it was not that difficult once I got a few, and while closing them up after wasn't as easy as it sounded, I'm okay with messy appearance as long as the henna isn't leaking while I'm working.
After allowing the paste to sit for several hours I strained it into to carrot or piping bag.
and then squeezed it into each cone, a little messy but everything wiped down easily enough and after taping them suffiently enough I tested out my finished paste and cones.
They're not the prettiest, I used more tape than necessary and the holes aren't even sizes, but they're mine and I'm super proud of them.
Paste went on well and was a beautiful black color, but I think I used too much water and not enough sugar because as soon as it dried it started cracking, so it wasn't able to stay on more then 45 minutes to stain.
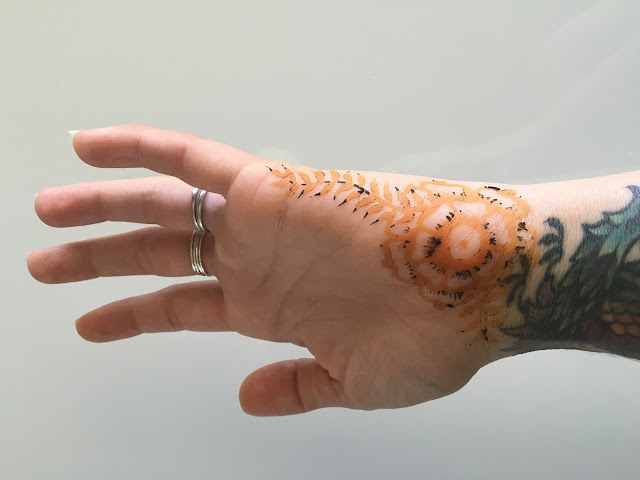
Even with a short time on my skin it still turned bright orange and darkened up over the next few days. It's over a week and there was still a faint ghost stain, so I think if it had stayed on longer it would have been much darker.
After making the paste, another friend came over and let me practice on her arm. This isn't with my paste (because it wasn't completely ready yet, this is Joeys') but I figured why not make a henna day out of the whole thing, ya know? I think this piece might have taken about 45 minutes? had to keep track when toddlers keep coming into the kitchen asking for snacks and water.
and because I don't think I shared this here, this is my most recent thigh design (inspired by LOTS of pinterest images). I wish I could reach other parts of my body as easily to practice, but this is fun too. It's actually fading at the moment and I hope it's completely gone by the time we leave so I can doodle a fresh stain for our trip.
This is that beautiful pumpkin orange that's under the paste when you first remove the dried henna paste from your skin, and if you can manage to avoid water for 24-48 hours after you expose the stain you'll get a deep red brown stain that lasts for a week or two, maybe longer if you're good about coconut oil and keeping the stain hydrated,
I'll have more updates for you all again once I get back into town, I'm sure my travels will have me doodling on trains and planes like crazy!


No comments:
Post a Comment